Monday, December 26, 2011

"Boot-Repair" - Grub installer GUI application

I've recently installed Ubuntu 11.10 along with Windows 7. After installing Ubuntu when the machine restarted, it simply started with windows 7 just as I haven't installed any other OS.

But somewhat different from before, it showed an error saying, "MBR error 3".
And when I searched here and there, I was able to find out there's nothing wrong with Ubuntu installation.  The problem is the grub has not installed properly. So I had to reinstall the grub.

I was able to find a really cool application called "Boot-Repair". Here is how to use it and re-install grub just in few minutes.

First you need to boot Ubuntu from a Live CD. Then you have to install this "Boot-Repair" application. For that, simply enter the following commands one after the other (in a terminal).

sudo add-apt-repository ppa:yannubuntu/boot-repair
sudo apt-get update
sudo apt-get install boot-repair
This will install "Boot-Repair" application, so then you can re-intall grub just by one click. :)

Load the application and you will see an option there to re-install grub. This will repair the above error. When you restart, you will be prompted to choose the OS as you expected.

If you still want to do this manually you can do it as it is in this Ubuntu forum.
http://ubuntuforums.org/showthread.php?t=1893219

Saturday, November 19, 2011

Shell Scripting 2 - What is Shell Scripting ?

In my previous post I've explained what Linux Shell is. Simply it is another program where you can give commands in text mode to get some work done.

However you can write a sequence of commands in a file and tell the shell to execute those commands. Then those files are called shell scripts. (File extension is .sh)

Such a script can be defined as a specific command defined to get a specific work done.

Shell scripting is very useful in a way that, if you want to do a task again and again then you can write the required commands as a shell script and execute it.

Ok, now let's try a simple shell script.

A Simple Shell Script

BASH is the default shell for Linux. Let's script using BASH commands. First we will write a simple script to print "Hello world ! " in the terminal.


You can use any text editor (gedit, vi, emacs, etc.) to write a shell script. Remember the script should be saved with .sh extension. 

Write the following lines in a file and save it as 'hello.sh'.
#!/bin/bash
echo "Hello, World!" 
Now you can execute this hello.sh script.
  1. Open a terminal
  2. Go to the location where you've saved the above file
  3. Then to execute, type, sh hello.sh (Or else you can give execution permission to the above file and then execute it.)
If you have a little touch with shell commands you know the above line no. 2 is enough for printing "Hello, World" in the terminal. So why do we include line no.1 's content ?

It is called a shebang or a "bang" line. In this line we give the absolute path to the BASH interpreter.

Shebang includes the hash sign and an exclamation point character (#!), followed by the full path to the interpreter such as /bin/bash. This will ensure that, the script is using the specified BASH interpreter even if it is executed under another shell.

Note : Giving execution permission to the script.

To give the execution permission to the file you can use the following command.

>> chmod  +x  /path to file

This is a very simple shell script. We can do a lot of things using shell scripting. Hope to bring them one by one in my next posts.

Friday, October 28, 2011

Shell Scripting 1 - What is Linux Shell ?

Do you know what Linux 'Kernel' is? Simply, it is the heart of the Linux Operating System. It manages the resources. (ie. Memory management, File management, I/O management, Device management, etc.) Kernel lies close to the hardware. So the language it can understand is more over low level. 

For humans to work with the operating system, there are human readable commands. Shell is the special program which converts those human readable commands in to the format which Kernel can understand. So shell is also a user program, which provides a more convenient environment for humans to interact with the system. 


Shell executes commands that are given from the keyboard or a file. There are several shells.
  • BASH
  • CSH
  • KSH
  • TCSH
You can access the Shell simply by opening a terminal. Or else you can connect through SSH (Secure Shell).

Note :  All the available shells in the system can be found in /etc/shells file.
            Current shell name is assigned to SHELL variable.

Let's see what is Shell Scripting in my next post.

Monday, October 24, 2011

Vaadin - Including HyperLinks Inside Text

Vaadin is meant for creating Java web applications. It has built in "Link" component which is needed to include hyperlinks. It works as follows;
Link link = new Link("Click Here", 
                                 new ExternalResource("http://vaadin.com/")); 
//
But when we are using this Link component, the entire String (ie. "Click Here" in the above example), becomes the hyperlink.

But if we want something like, only the word "Here" to be the hyperlink and the "Click" to be in normal text, Vaadin has no solution for it. Vaadin doesn't have a component to use for that.


Left side hyperlink is created using "Link" component and the right side hyperlink is created using "CustomLyout"

To include that kind of a hyperlink we have to use Vaadin "CustomLayout" component. Here is how to create a hyperlink using CustomLayout.

With the CustomLayout component we can create Layouts as a template in XHTML.
String text = "Click " + "<a href='http://vaadin.com/'>" + "Here" + "</a>";
CustomLayout customLayout = new CustomLayout(new ByteArrayInputStream(text.getBytes()));
//

Further we can add styles to the above created CustomLayout, just as we are doing for other Vaadin UI Components.

Thursday, October 20, 2011

How to add Syntax Highlighting in Blogger

Do you like to post your code snippets in your blog as below ?
public class HelloWorld {
    
    public static void main(String[] args) {
        
        System.out.println("Hello World");
    }
}

It looks really pretty. SyntaxHighlighter is the solution for it.

You can download the SyntaxHighlighter from here.

You can either upload the necessary files to your preferred location or you can access them from google-code's SyntaxHighlighter project files. But when accessing them from google code project files, css styles need to be copied and pasted in to your blog's HTML template. It's bit risky, instead you can upload the files in to your website. (https://sites.google.com/ is a really cool place where you can easily upload these files).

To enable code syntax highlighting in your blog posts, you need to add few lines to the html code of your template.

To do this, go to Design -> Template -> Edit HTML -> Proceed

Then add the following lines between <HEAD></HEAD> tags. (you can simply insert them just before the </HEAD> tag).
<link href='YOUR-UPLOADED-LOCATION/SyntaxHighlighter.css' rel='stylesheet' type='text/css'/>
<script src='YOUR-UPLOADED-LOCATION/shCore.js' type='text/javascript'> 
</script> 
 
<!--According to the programming language you want to post in your blog-->
<!--include the following lines as necessary-->
<!--Below 2 lines are for java codes and xml codes--> 
<script src='YOUR-UPLOADED-LOCATION/shBrushJava.js' type='text/javascript'>
</script> 
<script src='YOUR-UPLOADED-LOCATION/shBrushXml.js' type='text/javascript'> 
</script> 
Of course you can insert the relevant lines for all the available programming languages in  SyntaxHighlighter. But this will take some more time to load your blog. So include only necessary languages.

Then insert the following lines just before </BODY> tag and save the template. Now the changes to the template are done.
<script language='javascript'>
dp.SyntaxHighlighter.BloggerMode();
dp.SyntaxHighlighter.HighlightAll('code');
</script> 
Now, you can compose a blog post with code snippets. When including code snippets, you should write them between <pre></pre> tags. To do this you have to switch the HTML tab in your blog editor.
<pre name="code" class="java">
...Java code goes here...
</pre>
To insert a Java code you should mention "java" for the "class" attribute. Like this, for all the available programming languages, there is a specific attribute value for "class" attribute. You can find the supported language list and the relevant attribute values from here.
(ie. cpp, c, c++, c#, c-sharp, csharp, css, delphi, pascal, java, js, jscript, javascript, php, py, python, rb, ruby, rails, ror, sql, vb, vb.net, xml, html, xhtml, xslt)

But, remember one thing, you can't include XML, HTML code as it is. < and > symbols will cause issues in displaying your blog post. So replace them with their counterpart escape characters. For replace < with &lt; and replace > with &gt;

You can read more on SyntaxHighlighter from here.

A small note on how to upload a file on to https://sites.google.com/

Once you create a site on https://sites.google.com/ go to More -> Manage site -> Attachments. There you can upload your files. :)

Monday, October 17, 2011

Date Validation in Java

Java's DataFormat class may be very familiar to you. We use it very often when we want to format a Date object, for example;


public class DateValidationExample {
   
    public static void main(String[] args) {

        SimpleDateFormat simpleDateFormat = new SimpleDateFormat("dd-MMM-yyyy");

        String formattedDate = simpleDateFormat.format(new Date()); 

        System.out.println(formattedDate); 

     }
}
The output will be  

      "01-Nov-2011"

Now let's try it the other way around. Let's try to parse a String as a Date.


public class DateValidationExample {
   
    public static void main(String[] args) {

        String dateAsString = "01-Nov-2011";

        SimpleDateFormat simpleDateFormat = new SimpleDateFormat("dd-MMM-yyyy"); 

        Date date = simpleDateFormat.parse(dateAsString); 

        System.out.println(date); 

     }
}

The output will be

      "Tue Nov 01 00:00:00 GMT 2011"

Now let's try "31-Nov-2011". Note that November doesn't have a 31st. But if we try the following code it will give an output without any problem.


public class DateValidationExample {
   
    public static void main(String[] args) {

        String dateAsString = "31-Nov-2011";

        SimpleDateFormat simpleDateFormat = new SimpleDateFormat("dd-MMM-yyyy"); 

        Date date = simpleDateFormat.parse(dateAsString); 
        
        System.out.println(date); 

     }
}


The output will be 

      "Thu Dec 01 00:00:00 GMT 2011" 

How does this happen ?

Although the month November has only 30 days, the parser will assume that the user means,

      "30th November + 1 day"

So it will give the output as 1st of December.

But in some cases we need to validate the dates. For example, when we check for input validation, when a user enters an invalid date like the above 30th of November or 31st of February, our program should be capable of validating the date and showing user the date entered is incorrect. So how can this be achieved in Java ?

Answer is simple. In Java DateFormat class, there is a method called 'setLenient()'. When we set this setLenient(false) in our code it will check whether the date is a correct calendar date, otherwise throws an exception.

Let's try the following code to clearly understand this. 


public class DateValidationExample {
   
    public static void main(String[] args) {

        SimpleDateFormat simpleDateFormat = new SimpleDateFormat("dd-MMM-yyyy"); 

        simpleDateFormat.setLenient(false);

        Date date = simpleDateFormat.parse("31-Nov-2011"); 

        System.out.println(date); 

     }
}

The output here is

      java.text.ParseException: Unparseable date: "31 Nov 2011"
 
Thus we can validate dates. :)

Thursday, October 13, 2011

CSS Tips

Centering a web page in the browser

Do you feel there's nothing to worry about centering a web page in the browser ? But it really matters when you are testing your website for browser compatibility. That is because browsers have default style sheets that are loaded automatically. These default style sheets work as foundation style sheets for other style sheets.

If you've ever tried to center a web page and tested it for different web browsers, you may have experienced issues with internet explorer.

For Chrome and Firefox 
Let's specify a main div tag for the main layout we are using. Then specify a style for that div tag.


Remember, this div should have a fixed width

But this styles definition will not work for internet explorer.

In order to overcome this issue you have to include the following css styles to your style sheet.

For Internet Explorer
The style should be given to body tag.


Then we have a little more work to do. We should specify text-align : left; for main div tag's style, otherwise it will inherit text-align : center; from the body and will try to center all the elements inside it.

So finally the basic html code and styles look like in the following code. I've used embedded styles for the easiness to  understand.


Below image shows how it  is displayed in the browser.


Tuesday, September 27, 2011

Tomcat Tips

Redeploying web applications in Apache Tomcat using touch command

In this post I am going to tell you about a way to redeploy web applications in Apache Tomcat. This is a best practice in using Tomcat in deployment environment.

When testing the deployed web applications in Apache Tomcat, often we need to redeploy them. During the first couple of days I'm using Tomcat, when I want to redeploy a web application, what I always did was, shutting down the Tomcat server and then again starting it. But think for a moment, can we do this in deployment environment ? We can't. Because, when we shut down the Tomcat server just to redeploy a single web application , all the other applications inside that server go down. This is very risky in sometimes.

So, how can we redeploy a single web application inside Tomcat without affecting others ? There is a very simple way, and it's just a command only. It is the "touch command". Here is how to use it.

$ touch <path-to-web-app>/WEB-INF/web.xml

It's as simple as that. :)

What is web.xml file ?  

It is called the web application's deployment descriptor. It contains the configuration details and other useful details of the web application. 

The url mappings are contained in the web.xml file. When the web server receives a request for the application, it uses the deployment descriptor to map the URL of the request to the code that ought to handle the request.

You can read more on web.xml file from here.


Friday, September 23, 2011

Apache Tomcat - Web Application Deployment

Have you ever tried deploying web applications in Tomcat, keeping the war file somewhere other than 'webapps' directory. For example, inside your preferred directory.

Once I had to find a method to do so. So I found out what actually happens when we put a .war file into 'webapps' directory in Tomcat. (This is the conventional way we use to deploy web applications in Tomcat.)

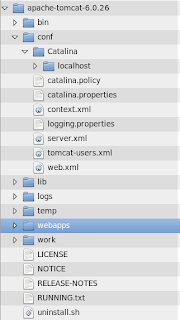
Here is the directory structure of Tomcat


As we all know when we put a .war file in to the 'webapps' directory in Tomcat, while Tomcat is running, it is deployed automatically. During the deployment process, Tomcat unpacks the .war file and creates a directory with the name of the application and keeps it inside the 'webapps' directory. Further, it puts a context XML file inside $CATALINA_HOME/conf/Catalina/localhost/ directory.

These things happen automatically, according to a preconfigured method. But we can deploy web applications, by manually creating the above mentioned context XML file.

Here are the simple steps we can follow in order to deploy web applications in Tomcat server without putting the .war file inside 'webapps' directory.

To do so, we need to create the context XML manually and put it in to the $CATALINA_HOME/conf/Catalina/localhost/ directory.

  1. Keep the application-name.war file inside your preferred directory.
  2. Create the context XML file with the name application-name.xml 
  3. This context XML file should contain the "Context element" as below
  4. Put the context XML file inside $CATALINA_HOME/conf/Catalina/localhost/ directory.

Once you put the context XML file inside the above mentioned directory, Tomcat search for the .war file (or the unpacked web application folder) in the location where you given as the "docBase" attribute value in the above mentioned "Context element". Then it will unpack the .war file in to the "webapps" directory.
So now the web application is deployed. :) 

Note : Remember, if you put the context XML file inside Tomcat , before placing the .war file in the location you mentioned, Tomcat will throw an exception saying it cannot find the war file in the location you've mentioned.


Thursday, September 8, 2011

Apache POI - The Java API to create Microsoft Office Documents

Apache POI is the Java API created to access Microsoft format documents using Java.

For example you can write data to an excel sheet using POI.

To write to an excel sheet first you need to create HSSFWorkbook object. This represents a Work Book in excel. Then you can create number of work sheets in this work book.

One a sheet is created you can get the rows in it one by one. These rows consist of cells. The data you need to write in the excel sheet should go inside these cells by providing them as the cell value. Further, these cells can be formatted to have different types of data inside them, such as numeric type, formula type, etc.


Monday, March 14, 2011

JSP

JSP - Java Server Pages - In simplest words, it is a way of embedding JAVA inside HTML.

Suppose we want to display date and time on our web page. We can do this by simply adding a single line of java code inside our html code. For example,

<HTML>
<BODY>
Now it's <%= new java.util.Date() %>
</BODY>
</HTML>

The code in between <%= and %> will do what we want.

But remember this file should be saved as .jsp.

Saving it as a jsp file is not enough. So why? Let's look at what happens here.

This should reside in a jsp capable web server (for example, apache Tomcat).

So we need to save this jsp file inside the server (in Tomcat, inside webapps --> ROOT). Then open a browser and give it the path to the jsp file you just saved. (If it is saved in the local machine http://127.0.0.1/filename.jsp)

You will see the current date and time as the output.

What exactly happens here is, this jsp file is turned in to a java file and then compiled and loaded. Then if you reload the page after a while you'll see it displays new time. But when it is loaded for the second time it will not take a longer time as it does in loading for the first time. This is because, for the first time, it needs to be compiled, but when it is reloaded it need not to be re-compiled again. The java code inside <%= and %> are evaluated at run time, so new time will be displayed.

So in simple words, jsp enables developers to easily make dynamic web pages.