Thursday, November 27, 2014

How to Create an Axis2 Web Service

In this post I'm going to explain a simple way to implement an Axis2 Web Service and how to deploy it.

This is a simple Order Processing service. I will start with a simple Java class and show you how to make a web service from it by including necessary configuration and packaging.

First create a maven project with this pom.
 

    4.0.0
    OrderProcessingService
    OrderProcessingService
    1.0    


Next add a Java class to your project with the name of the web service. This Java class contains all the methods which will be exposed as the operations of the web service.
import java.util.HashMap;  
  
/** 
 * Created with IntelliJ IDEA. 
 * User: manorama 
 * Date: 11/27/14 
 * Time: 2:22 PM 
 * To change this template use File | Settings | File Templates. 
 */  
public class OrderProcessingService {  
  
    private HashMap ordersMap = new HashMap();  
  
    public double getAmount(String orderID) {  
  
        Double price = (Double) ordersMap.get(orderID);  
        if(price != null){  
            return price.doubleValue();  
        }  
        return 0.00;  
    }  
  
    public void submitOrder(String orderID, double amount) {  
  
        ordersMap.put(orderID, amount);  
    }  
}

Next we have to add a service descriptor to the project. This is an xml file with the name services.xml. Each Axis2 service must have a service descriptor. The service descriptor informs Axis2 about the service.


Create a folder META-INF inside resources folder. And create an xml file services.xml inside that folder.

For the Order Processing Service, the service descriptor is as follows.

    
        Order Processing Service


        OrderProcessingService
    

We write the details about a web service inside the <service > element. We define message receivers that need to be used for the web service operations inside < messageReceivers > element. < parameter > element contains the name of the service implementation class.

Now we're done with the coding. Next step is to package the service implementation and configuration files according to the Axis2 format.

First compile the above code. It will create the directory target which contains the compiled class files inside the classes folder in it. Then simply change the directory to target/classes.

$cd target/classes

You can see the .class files and the META-INF directory containing the services.xml.

Now run the following command to package all the files into an aar archive with the relevant service name. In this example it is OrderProcessingService.aar

$jar -cvf OrderProcessingService.aar  *

To deploy the web service, copy the generated OrderProcessingService.aar into $AXIS2_HOME/repository/services

You can see the deployed service once you start the Axis2 server and point the browser to http://localhost:8080/axis2/services.

To invoke this web service using a client follow this tutorial.

Reference :
[1] http://wso2.com/library/95/

Wednesday, November 26, 2014

Append to $PATH vs import $PATH

We know .bashrc file inside our Ubuntu home folder is the file in which we set the environment variables for a single user. This is the bash script file.

Linux determines the executable search path with the $PATH environment variable

For example, after installing JDK we set $JAVA_HOME variable and update the $PATH variable.

To set those variables, we add the following lines at the end of the .bashrc file.

JAVA_HOME=/home/user/Java/jdk1.7.0_03
export JAVA_HOME
PATH=$PATH:$JAVA_HOME/bin
export PATH

So, what is the actual use of export even after appending the relevant path to the $PATH environment variable? Why do we need to export even after appending it to the $PATH variable?

The reason is,

Appending only to the $PATH is not sufficient because, it is same as setting a value inside a script (Here, only in .bashrc script). Thus that change is effective only within the script. In Ubuntu, it will be effective only within bash.

To make this change effective to any program called by bash we need to export the environment variable.


Saturday, February 15, 2014

Snapshot Feature in VirtualBox


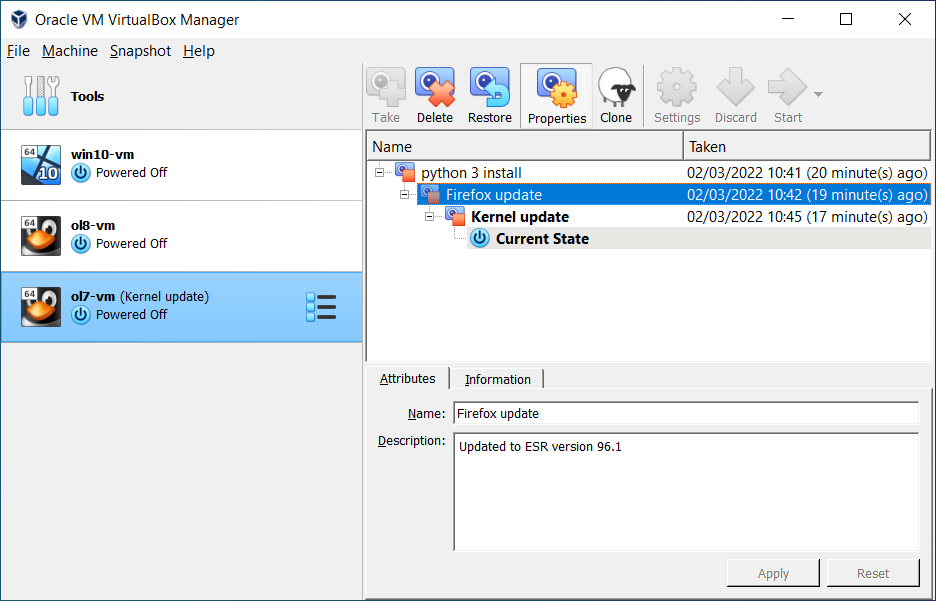
Oracle VirtualBox is a cross platform application that allows you to install one operating system on top of another.  "Snapshots" is a cool feature offered with VirtualBox.

With this feature we can save a particular state of a virtual machine and revert back to that state, if necessary. This is really helpful when experimenting. If something goes wrong we can easily switch back to a previous snapshot and avoid the need of frequent backups and restores. After reverting, the virtual machine will be exactly how it was before. It is similar to reverting back to a particular revision in a version control systems we are using when doing coding stuff.


We can create any number of snapshots, and they allow us to travel back and forth in virtual machine time. Snapshots can be deleted while a VM is running, to reclaim disk space.

Remember these as well;
  • Once you ask VirtualBox to take a snapshot the virtual machine will be dim out periodically while a point in time snapshot is taken.
  • To revert back to a particular snapshot you have to shut down the VM first.

sources.list file in Ubuntu

This is something I got to know recently while trying to install a new software package on Ubuntu. 

In Ubuntu, we use apt-get command line tool very often. It is, Ubuntu's Advanced Packaging Tool (apt) which performs functions such as installation of new software packages, upgrade of existing software packages, updating of the package list index, and even upgrading the entire Ubuntu system. 


sources.list file located in /etc/apt folder, is the default file which contains the details about the repositories needed when installing or upgrading the applications. When the system needs to know from where it may download the related stuff to install/upgrade it basically goes through this file.  
Repositories are servers which contain sets of packages. Ubuntu uses apt for package management. apt stores a list of repositories or software channels in this file. 

We can add a new repositories by simply adding a new line to this file. You can learn about the format of the entries in this file here

Once the editing stuff done, we have to do one more thing. Just to make apt aware of the changes done to sources.list, run;
sudo apt-get update
You can read further in Ubuntu help page.

Wednesday, June 27, 2012

Genetic Algorithm - To find optimum solutions

Genetic Algorithm is an adaptive method to find an optimum solution for a problem. There are some real world problems for which we cannot find a solution using a particular algorithm. But those problems may have solutions. Genetic Algorithm is a suitable method for finding an optimum solution for such a problem.

Genetic Algorithm belongs to the category of Stochastic methods.  Stochastic methods never operate in the same way twice for a particular problem. They are involved with probabilistic operations.

By applying Genetic Algorithms we expect to achieve the "Survival of Fittest". That is among a population of solutions, Genetic Algorithm works in a way such that the fittest solutions are survived and further being improved.

In Genetic Algorithm terminology, "Chromosome" represents the whole solution for a particular problem. Genetic Algorithm operations start with defining a population of such chromosomes, which represent feasible solutions for the problem. A population is called a generation.

To generate the next generation from the first generation, the fitness of the chromosomes are evaluated. This is done using the "Fitness Function". The most fittest chromosomes become candidates for crossover operation, which creates new chromosomes by including the good features from its parent chromosomes. Then they are undergone through mutation, which introduce new features which are not included in the parent chromosomes. This operation is done to maintain genetic diversity.

Thus, the Genetic Algorithm runs through generations, until it achieves the defined optimum level. In each generation, it creates an improved solution compared to previous generation. So the quality of the solution increases through the generations.

There is a computational overhead due to the lot of operations performed on each and every chromosome in the population. So to achieve a considerable performance level, Genetic Algorithm needs some operations to perform in parallel.

Tuesday, March 6, 2012

Some useful commands in C programming

Recently I have used C for one of my projects. Here are some commands which make it easy for me to compile simple C source files.

Once you save the C source code in source_file_name.c file, you can compile it with gcc command.

gcc source_file_name.c 

This command will compile your source code. The output file name will be a.out. But if you need to give the output file a name you prefer, you can simply give the following command.

gcc source_file_name.c -o output_file_name

Then it will write the object code (compiled code) in to the file "output_file_name".

You can then run the file by just giving its name in the terminal.

$ ./output_file_name

But these are two separate commands. If you need to compile and run your C program using just one command, then you can use the following command.

gcc source_file_name.c -o output_file_name && ./output_file_name

This will compile your source code first and if compilation is successful it will execute the program.

Very basic stuff, but useful. Isn't it :)

note : Why we need to use ./ to execute a program ? 

It is because, in Linux operating systems, to run a program we need to specify the directory where that program file is located. Here ./ means "Current Directory". Otherwise the directory should be listed in the PATH system variable.

Monday, December 26, 2011

"Boot-Repair" - Grub installer GUI application

I've recently installed Ubuntu 11.10 along with Windows 7. After installing Ubuntu when the machine restarted, it simply started with windows 7 just as I haven't installed any other OS.

But somewhat different from before, it showed an error saying, "MBR error 3".
And when I searched here and there, I was able to find out there's nothing wrong with Ubuntu installation.  The problem is the grub has not installed properly. So I had to reinstall the grub.

I was able to find a really cool application called "Boot-Repair". Here is how to use it and re-install grub just in few minutes.

First you need to boot Ubuntu from a Live CD. Then you have to install this "Boot-Repair" application. For that, simply enter the following commands one after the other (in a terminal).

sudo add-apt-repository ppa:yannubuntu/boot-repair
sudo apt-get update
sudo apt-get install boot-repair
This will install "Boot-Repair" application, so then you can re-intall grub just by one click. :)

Load the application and you will see an option there to re-install grub. This will repair the above error. When you restart, you will be prompted to choose the OS as you expected.

If you still want to do this manually you can do it as it is in this Ubuntu forum.
http://ubuntuforums.org/showthread.php?t=1893219