Showing posts with label web services. Show all posts

Friday, January 9, 2015

How to Implement a Class Mediator for WSO2 ESB

A Mediator is simply a processing unit in the ESB. A mediator can do any modification to the messages.

In WSO2 ESB there are so many built-in mediators available. Also we can write custom mediators and add more to the available capabilities of the ESB.

Among those built in mediators Class Mediator is capable of creating an instance of a custom-specified class and set it as a mediator. There are two approaches to create custom mediators.
  • Extend the org.apache.synapse.mediators.AbstractMediator class
  • Implement the org.apache.synapse.api.Mediator interface 

In this post I'm going to show you how to implement a simple Class Mediator and using it in a proxy service.
  1. Create a maven project with the name OrderServiceMediator.
  2. You need to add the following dependency to your pom.xml
  3.         
                org.apache.synapse
                synapse-core
                2.1.2-wso2v4
            
    
  4. Also you will have to configure the required maven repository as follows. If this is not configured once you try mvn clean install it will give the following error.
    [ERROR] Failed to execute goal on project OrderServiceMediator: Could not resolve dependencies for project
  5.         
                wso2-nexus
                WSO2 internal Repository
                http://maven.wso2.org/nexus/content/groups/wso2-public/
                
                    true
                    daily
                    ignore


  6. Here is my pom.xml after configuring everything.
  7. 
        4.0.0
    
        org.wso2.training.manorama
        OrderServiceMediator
        1.0


                wso2-nexus
                WSO2 internal Repository
                http://maven.wso2.org/nexus/content/groups/wso2-public/
                
                    true
                    daily
                    ignore


                org.apache.synapse
                synapse-core
                2.1.2-wso2v4


Next step is to write the Class Mediator Java code. 
  1. Create a new package called mediator (or any other package name you prefer).  If you skip this step once you try to deploy the mediator in ESB Carbon will not make a bundle from it. So you will get the following error.
    wso2 esb org.eclipse.osgi.internal.loader.BundleLoader.findClassInternal(BundleLoader.java:501)
  2. Add a new Java class CustomMediator which extends the AbstractMediator.
  3. Now you will have override the public boolean mediate(MessageContext messageContext) method.
  4. Implement the logic inside this method to do whatever modifications you need to do to the messages .
  5. Here in my simple class mediator I am going to give a discount for the orders submit to the OrderProcessingService which is deployed in the Axis2 server. (This is the same OrderProcessingService described in my previous post).
  6. package mediator;
    
    import org.apache.commons.logging.Log;
    import org.apache.commons.logging.LogFactory;
    import org.apache.synapse.MessageContext;
    import org.apache.synapse.mediators.AbstractMediator;
    
    import javax.xml.namespace.QName;
    
    /**
     * Created with IntelliJ IDEA.
     * User: manorama
     * Date: 1/05/15
     * Time: 10:25 AM
     * To change this template use File | Settings | File Templates.
     */
    public class CustomMediator extends AbstractMediator {
    
        private static final Log log = LogFactory.getLog(CustomMediator.class);
    
        private String discountFactor = "10";
        private String bonusFor = "10";
        private int bonusCount = 0;
    
        @Override
        public boolean mediate(MessageContext messageContext) {
    
            // xs:schema targetNamespace given in the WSDL is "http://ws.apache.org/axis2"
    
            String price = messageContext.getEnvelope().getBody().getFirstElement().
                    getFirstChildWithName(new QName("http://ws.apache.org/axis2","amount")).getText();
    
            int discount = Integer.parseInt(discountFactor);
            int bonusNo = Integer.parseInt(bonusFor);
            double currentPrice = Double.parseDouble(price);
    
            // Discounting factor is deducted from current price form every response
            Double lastPrice = new Double(currentPrice - currentPrice * discount / 100);
    
            // Special discount of 5% offers for the first responses as set in the bonusFor property
            if (bonusCount <= bonusNo) {
                lastPrice = new Double(lastPrice.doubleValue() - lastPrice.doubleValue() * 0.05);
                bonusCount++;
            }
    
            String discountedPrice = lastPrice.toString();
    
            messageContext.getEnvelope().getBody().getFirstElement().
                    getFirstChildWithName(new QName("http://ws.apache.org/axis2","amount")).setText(discountedPrice);
    
            log.info("Order price discounted");
            log.info("Original price: " + price);
            log.info("Discounted price: " + discountedPrice);
    
            return true;
        }
    
        public String getType() {
            return null;
        }
    
        public void setTraceState(int traceState) {
            traceState = 0;
        }
    
        public int getTraceState() {
            return 0;
        }
    
        public void setDiscountFactor(String discount) {
            discountFactor = discount;
        }
    
        public String getDiscountFactor() {
            return discountFactor;
        }
    
        public void setBonusFor(String bonus) {
            bonusFor = bonus;
        }
    
        public String getBonusFor() {
            return bonusFor;
        }
    }
    
    
  7. Note that the setter methods are implemented, to set the required property values through the mediator.
  8. Next we will create the proxy service to the back-end service deployed in the Axis2 server. You can follow the steps mentioned in the WSO2 ESB user guide to create the proxy service. Here is my proxy service configuration.


    scenario1
  9. Now try to send a message to this proxy service and see the discounted price is assigned for to the amount. You can see the resulted value after going through the mediator using this url.

    http://localhost:8080/axis2/services/OrderProcessingService/getAmount?orderID=25

References :
[1] https://docs.wso2.com/display/ESB481/Sample+380:+Writing+your+own+Custom+Mediation+in+Java
[2] https://docs.wso2.com/display/ESB481/Class+Mediator
[3] http://stackoverflow.com/questions/24260091/wso2-esb-jar-file-with-callback-handler-not-loading 

Friday, December 19, 2014

Secure Web Services with WSO2 ESB as Integration Layer

WSO2 ESB supports securing unsecured web services. In this post I'm going to explain how you can secure a web service with WSO2 ESB, using it as an integration layer. 

You may have heard of proxy services. A proxy service is a virtual service hosted within an ESB. Simply a proxy service wraps a back-end web service hosted in an application server.  A proxy service receives messages that have been sent to a specific endpoint (back-end service) defined in the proxy service configuration. Before forwarding the messages to the relevant endpoint the proxy service can process them if needed, using mediators.

These back-end services may no be secured always. In such a case those unsecured services can be made secured by using the ESB as integration layer. To do that what we need to do is creating a secure proxy service with WS-Security enabled with a specified security policy. 

Here are the simple steps to follow to secure a web service.
  1. Open the ESB Management Console.
  2. Create a Proxy Service by clicking on the Services -> Add -> Proxy Service ->Pass Through Proxy in the Main tab. (Here I've selected Pass Through Proxy since I just need to forward messages to the endpoint without performing any processing on them)
  3.  Give a name for the Proxy Service and specify the target endpoint. Here I've given the web service URL which is hosted within the Axis2 server.


  4.  Then you will be redirected to the List of Services.
  5.  You will see the proxy service is shown as 'Unsecured'. Click on 'Unsecured'.


  6. You will be prompted to Enable Security. Select Yes. Then select the UsernameToken as the Basic Scenario.
  7. Click Next. Select user group and Finish.
  8. Now the proxy service is security enabled. You can see the endpoint starting with https:// service dashboard of the proxy service.

Now let's see how to access this web service using a secure client.

References : 

Friday, December 5, 2014

Client Implementation for REST web service with Jersy


In this post I will explain how to implement a client application to the RESTfull web service created in my previous post.

I'm going to use Jersy client API for this.

Here is the client Java class.

import com.sun.jersey.api.client.Client;
import com.sun.jersey.api.client.ClientResponse;
import com.sun.jersey.api.client.WebResource;

import java.util.logging.Level;
import java.util.logging.Logger;

/**
 * Created with IntelliJ IDEA.
 * User: manorama
 * Date: 12/4/14
 * Time: 4:41 PM
 * To change this template use File | Settings | File Templates.
 */
public class RESTClient {

    private static final Logger logger = Logger.getLogger(RESTClient.class.getName());

    public static void main(String[] args) {

        try {
            // GET request
            demoGET();

            // POST request
            demoPOST();
        } catch (Exception e)
        {
            logger.log(Level.SEVERE, e.getMessage());
        }
    }

    private static void demoPOST() {

        Client client = Client.create();

        WebResource webResource = client
                .resource("http://localhost:9090/RESTfulWS/musicservice/tracks");

        String input = "{\"singer\":\"Metallica\",\"title\":\"Fade To Black\"}";

        ClientResponse response = webResource.type("application/json")
                .post(ClientResponse.class, input);

        if (response.getStatus() != 201) {
            throw new RuntimeException("Failed : HTTP error code : "
                    + response.getStatus());
        }

        System.out.println("Output from Server .... \n");
        String output = response.getEntity(String.class);
        System.out.println(output);
    }

    /**
     * GET request
     */
    private static void demoGET() {

        Client client = Client.create();

        WebResource webResource = client
                .resource("http://localhost:9090/RESTfulWS/musicservice/randomtracks");

        ClientResponse response = webResource.accept("application/json")
                .get(ClientResponse.class);

        if (response.getStatus() != 200) {
            throw new RuntimeException("Failed : HTTP error code : "
                    + response.getStatus());
        }

        String output = response.getEntity(String.class);

        System.out.println("Output from Server .... \n");
        System.out.println(output);
    }

}


References:

[1] http://crunchify.com/how-to-create-restful-java-client-with-jersey-client-example/
[2] http://crunchify.com/how-to-create-restful-java-client-using-apache-httpclient-example/

Thursday, December 4, 2014

RESTfull Web Service with Embedded Jetty

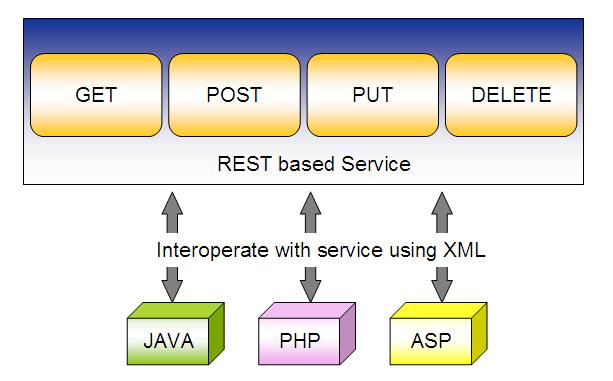
REST is an architectural style that used to write a web service in a certain way. It is based on web-standards and the HTTP protocol. This style was defined by Roy Fielding in 2000. 

In REST architecture the main concept is the Resource which can be uniquely identified by an Uniform Resource Identifier or URI. Every resource supports the HTTP operations.


In this post I'm going to describe how to implement a RESTfull web service which I am going to create as a standalone service with an embedded Jetty server. So you do not need to deploy it in a web container.

This is a simple web service to store and retrieve music track details.

Here is the pom.xml file which contains the relevant dependencies. You can see how the embedded Jetty server is configured through the maven-jetty-plugin and the port being set to 9090.


    4.0.0

    com.wso2.training.manorama
    RESTfulWS
    war
    1.0-SNAPSHOT
    RESTfulWS


            com.sun.jersey
            jersey-server
            1.18
        
        
            com.sun.jersey
            jersey-servlet
            1.18
        
        
            com.sun.jersey
            jersey-core
            1.18
        
        
            com.sun.jersey
            jersey-client
            1.18
        
        
            com.sun.jersey
            jersey-json
            1.18
        
        
            asm
            asm-all
            3.1
        
        
            javax.ws.rs
            jsr311-api
            1.1.1
        
        
            junit
            junit
            4.9
            test


                org.apache.maven.plugins
                maven-compiler-plugin
                2.5.1
                true
                
                    1.7
                    1.7


                org.mortbay.jetty
                maven-jetty-plugin
                6.1.22


                            9090
                            60000


        2.13
        UTF-8


This web service accepts requests in JSON format and responds with the same format.

Here is the data model Track.java

package com.wso2.training.manorama.model;

/**
 * Created with IntelliJ IDEA.
 * User: manorama
 * Date: 12/4/14
 * Time: 10:24 PM
 * To change this template use File | Settings | File Templates.
 */
public class Track {

    String title;
    String singer;

    public String getTitle() {
        return title;
    }

    public void setTitle(String title) {
        this.title = title;
    }

    public String getSinger() {
        return singer;
    }

    public void setSinger(String singer) {
        this.singer = singer;
    }

    @Override
    public String toString() {
        return "Track [title=" + title + ", singer=" + singer + "]";
    }

}
Now I will describe you how to implement the RESTfull web service for this. Here is the web service implementation class.

package com.wso2.training.manorama;

import com.wso2.training.manorama.model.Track;

import javax.ws.rs.*;
import javax.ws.rs.core.MediaType;
import javax.ws.rs.core.Response;

/**
 * Created with IntelliJ IDEA.
 * User: manorama
 * Date: 12/4/14
 * Time: 10:23 PM
 * To change this template use File | Settings | File Templates.
 */
@Path("/musicservice")
public class JSONService {

    @GET
    @Path("/randomtracks")
    @Produces(MediaType.APPLICATION_JSON)
    public Track getTrackInJSON() {

        // Here you can modify this code to get a random track from the available music tracks

        Track track = new Track();
        track.setTitle("Enter Sandman");
        track.setSinger("Metallica");

        return track;
    }

    @POST
    @Path("/tracks")
    @Consumes(MediaType.APPLICATION_JSON)
    public Response createTrackInJSON(Track track) {

        String result = "Track saved : " + track;
        return Response.status(201).entity(result).build();
    }
}

To map the incoming requests, we configure the web.xml (webapp/WEB-INF/web.xml)

    
        RESTfulWS
        com.sun.jersey.spi.container.servlet.ServletContainer
        
            com.sun.jersey.config.property.packages
            com.wso2.training.manorama
        
        
            com.sun.jersey.api.json.POJOMappingFeature
            true
        
        1
    
    
        RESTfulWS
        /*
    

When looking at the web service implementation java code, you can see the GET requests with the pattern /randomtracks come to the getTrackInJSON() method. It will respond with a Track object in json format. Note the @Produces(MediaType.APPLICATION_JSON) annotation.

The POST requests comes with the pattern /tracks will create a new Track object and responds with the HTTP 201 OK.The Track object should be in the json format. Note the @Consumes(MediaType.APPLICATION_JSON) annotation

     com.sun.jersey.api.json.POJOMappingFeature
     true

This will map the POJO class to json. Thus the posted json string will be converted into “Track” object automatically.

To deploy this you will need several libraries to be included in the webapp/WEB-INF/lib folder
  • asm-3.1.jar
  • jersey-client-1.18.jar
  • jersey-core-1.18.jar
  • jersey-json-1.18.jar
  • jersey-server-1.18.jar
  • jersey-servlet-1.18.jar
  • jsr311-api-1.1.1.jar 
Since this is a standalone service you do not need to deploy it in a web container. Simply run,

$ mvn jetty:run

To invoke this web service here is how to implement the client application.

Thursday, November 27, 2014

How to Create an Axis2 Web Service

In this post I'm going to explain a simple way to implement an Axis2 Web Service and how to deploy it.

This is a simple Order Processing service. I will start with a simple Java class and show you how to make a web service from it by including necessary configuration and packaging.

First create a maven project with this pom.
 

    4.0.0
    OrderProcessingService
    OrderProcessingService
    1.0    


Next add a Java class to your project with the name of the web service. This Java class contains all the methods which will be exposed as the operations of the web service.
import java.util.HashMap;  
  
/** 
 * Created with IntelliJ IDEA. 
 * User: manorama 
 * Date: 11/27/14 
 * Time: 2:22 PM 
 * To change this template use File | Settings | File Templates. 
 */  
public class OrderProcessingService {  
  
    private HashMap ordersMap = new HashMap();  
  
    public double getAmount(String orderID) {  
  
        Double price = (Double) ordersMap.get(orderID);  
        if(price != null){  
            return price.doubleValue();  
        }  
        return 0.00;  
    }  
  
    public void submitOrder(String orderID, double amount) {  
  
        ordersMap.put(orderID, amount);  
    }  
}

Next we have to add a service descriptor to the project. This is an xml file with the name services.xml. Each Axis2 service must have a service descriptor. The service descriptor informs Axis2 about the service.


Create a folder META-INF inside resources folder. And create an xml file services.xml inside that folder.

For the Order Processing Service, the service descriptor is as follows.

    
        Order Processing Service


        OrderProcessingService
    

We write the details about a web service inside the <service > element. We define message receivers that need to be used for the web service operations inside < messageReceivers > element. < parameter > element contains the name of the service implementation class.

Now we're done with the coding. Next step is to package the service implementation and configuration files according to the Axis2 format.

First compile the above code. It will create the directory target which contains the compiled class files inside the classes folder in it. Then simply change the directory to target/classes.

$cd target/classes

You can see the .class files and the META-INF directory containing the services.xml.

Now run the following command to package all the files into an aar archive with the relevant service name. In this example it is OrderProcessingService.aar

$jar -cvf OrderProcessingService.aar  *

To deploy the web service, copy the generated OrderProcessingService.aar into $AXIS2_HOME/repository/services

You can see the deployed service once you start the Axis2 server and point the browser to http://localhost:8080/axis2/services.

To invoke this web service using a client follow this tutorial.

Reference :
[1] http://wso2.com/library/95/